Thursday, November 27, 2014

Bouldering in the Bishop sun

Bishop, California.

We made it here in two days, driving south through Washington, Oregon, California, into Nevada, and then back into California. Bishop is nestled in Owen's Valley of the Great Basin Desert, just east of the Sierra Nevada. We are staying for a month or so at the "pit" campground - friends and outhouses for only $2 a night can't be beat!

We've climbed three days so far, two in a place called The Happies, and one day in the stunning Buttermilks. We've been climbing with a bunch of friends from Victoria and Vancouver which has been great. Dan, Mika, Tristan, and Julie are all down here for several weeks as well. It's still a bit early for updates on progress and projects, but we have a few photos of the area to share...

The Happies is an area with a SUPER high concentration of boulders, and the rock is volcanic tuff like in Smith Rock. There are lots of pockets and fun holds, and the colours are lovely!

Kim warming up on the Sabres of Paradise boulder
Graham trying hard on Alex Patterson (V5)
Working the moves on Morning Dove White (V7)
After the Happies, we checked out the Buttermilks. The scenery is stunning. The boulders are big and well spaced, and the whole place has a light and airy feel. The granite boulders here reminded us a bit more of back home in Squamish, aside from the height of course.

Pretty scenery!
More pretty scenery!
Dan on top of a REALLY large boulder, the Grandma Peabody
Kim working on project Go Granny Go (V5)
Dan climbing Go Granny Ho (V7)
Graham considering a top out on the Smooth Shrimp boulder
Julie working the crux move of Perfectly Chicken (V5)
So close!!

And of course, there is life back in the pit. Such a fun place to hang out after a day on the rocks.

Jackson, looking majestic :)
Desert stars

Thursday, November 20, 2014

Hitting the road

We are on our way. Conversion = finished.

Our conversion project certainly demanded more than we expected, and of course took an unexpected amount of time to complete. We arrived in Victoria to work on the van on September 20, with grand ambitions of being on the road quickly. We were proven wrong...

Departure Goal #1: October 7, about 3 weeks after arrival. Quick rush for dentist appointments, insurance changes, etc before leaving.

Departure Goal #2: October 13, Thanksgiving

Departure Goal #3: October 18, leave on or around Mom's birthday

Departure Goal #4: October 25, the last weekend of October

Departure Goal #5: October 31, make it back to through Vancouver before November

Departure Goal #6: November 5, we can do it!

Departure Goal #7: November 9, by the end of the weekend

Departure Goal #8: November 13, seems reasonable...and on our way before the weekend

Departure Goal #9: November 16, out by the end of the weekend

Departure Goal #10: November 18, before the rains come

Actual Departure: November 20, two months after arrival

***
AND we're on our way now! Three and a half years in the making, we find it hard to believe that this road trip is really real. Over the next couple days we're taking the Millenium FalcVan through Vancouver and Seattle to see friends, then will be off to Bishop, California for the first month or so of climbing. Our goal is to post at least once for each location we visit throughout our adventure. We will also post more photos of the finished conversion in the near future. Friends and family - we're cancelling our phones tomorrow, so may the internet keep us connected.


For every great adventure,
Graham and Kim

 ***

Saturday, November 15, 2014

DIY VanLife: GMC Savana Camperization - cupboards, counter, shelves

We've done some more building - and are happy to report that this part of the process was fun and relatively simple! We decided to build some indoor living storage space where we can keep food and supplies, as well as a shelf for some odds and ends.

#1. The Cupboards

We bought a 20L water jug and sized out the depth and height of our counter based on its dimensions. We wanted the water jug on a shelf high enough to fit above a wash basin underneath and easily fill a full sized Nalgene water bottle. We also wanted a cupboard on either side of the water jug. So here's the initial template - 48 inch walls, a counter top that is 16.5 inches deep and 42 inches long, and cupboard height of 21 inches. The walls, shelves, and counter were made with leftover sheets of 1/2" and 5/8" plywood.


We covered our counter with more blue arborite counter top, and used a router to get clean cuts around the edges.


We also routed out grooves of 1/8" depth in the walls to inset our shelves and counter top more securely. We had to build all the puzzle pieces before we could assemble the whole unit.


Once in place, we had shelves of varying heights in each cupboard, and our home for the water!


As we will be living in a moving vehicle and driving our home around with us, we wanted to make as many "fences" as possible to keep things contained. We built a small fenced-in area at the rear on the counter top itself, and made smaller fences to screw onto the front of each shelf.


We also added that sticky no-slip stuff to our shelves to prevent (or reduce) the chance of things rolling around. Finally, we secured the whole structure to the wall. We didn't have much to play with, but we did manage to screw it into the side of the bed and used corner brackets to connect to the wooden studs we put in during the insulation phase. Pretty tight squeeze to get into these cupboards!


Finally, we built ourselves some cupboard doors. This was super fun - We cut 1/8" plywood to be inset into 0.75x1.75" cedar edges, and then glued and brad-nailed them together Pretty doors!


We went shopping for a new tool - a forstner bit - to drill holes to inset our full overlay hinges in the cupboard doors. It was pretty finicky getting the hinges aligned properly, but in the end I guess we got close enough - they work great! We painted one of the doors with chalkboard paint which we will be sure to fill with secret messages. 


#2. The Shelf

We decided to put our extra storage shelf at the foot of the bed. We had some difficulties trying to figure out how we would adhere it because the studs were limited in this area. We ended up deciding to make the shelf the full length of the bed so we could screw it into the metal with corner brackets at either end. One stud in the middle of the shelf provided some extra support, as did another divider with some support near the ceiling. We didn't want to put a door on this shelf, so we added a 4" fence to keep things from going flying.


The next mission = wiring the solar panel and all of our gadgets! Then we'll be on our way.

Tuesday, November 4, 2014

DIY VanLife: GMC Savana Camperization – Bed, Storage, Kitchen

Naive expectation number one: constructing the inside of the van will be waaaaaaaay easier and less finicky than building the initial interior "shell".

Ha. It turns out the finickiness was very high and compounded by the fact that this part of the construction timeline overlapped with Thanksgiving weekend and my mother's "Birthday Week" - both of which were essentially no-gos for getting anything done.

Graham and I have decided that the hardest part about doing a conversion is the decision making. We spent most of our time thinking and mapping and rethinking... each decision was critical and changed many times, particularly with the bed plan as this is the most important storage area in our van house. The "underbed" will eventually store:
- ALL climbing gear
- Clothing
- Propane
- Stove
- Kitchen + Kitchenware
- Deep Cycle Battery
- Cables, diode, breaker, controller, etc...
- other stuff

We knew we wanted a stationary bed, so we figured out the width that would work for Graham to sleep sideways across the vehicle. He is 5'11" and after the walls and insulation went in, the van spanned 5'9" inside. We started our planning by mapping everything out with painter's tape on my parents' living room floor. Note: while these photos are similar to our final layout, it did change a fair bit.

My dad had a great idea for our main structural supports that would maximize the underbed space. We used 1"x 3" wooden beams to build two main "ladders" that would form the sides of our underbed drawers and compartmentalize the storage space. In each ladder, two 57" beams were separated by five 1" x 3" segments screwed into place, and then we used wood glue to attach 1/8" plywood to the ladders to enhance the shear strength. Our final ladders were exactly 16" high. Building these stacked structural supports ended up saving us a lot of room on the floor.


Next, we built structural supports to go against the two walls and added horizontal beams throughout the structure to help us further compartmentalize around the wheel wells and add support for the bed top.


The next big mission was building the drawers. We bought 28" 200lb full extension drawer slides for the back drawer - this will be where we store our gear. For the interior clothing (etc) drawer we picked up 26" 100lb full extension slides. The drawers themselves actually took quite a while to build, in part due to their large size, and in part due to the fact that there is only 1/32" wiggle room to play with for the drawer slides. We used 5/8" plywood for the drawer bases and 1/2" plywood for the sides. 96 screws and a lot of wood glue later...


After accounting for spacing around the drawers, both ended up being 14 1/4" deep. The gear drawer is 28 1/2" long and just over 29" wide, and the clothing drawer is 27" long and slightly wider (due to the smaller slides). These are very big drawers! We added a snazzy divider to the clothing drawer so our panties don't touch ;)


We mounted the drawers and learned some very useful tips from this handy YouTube video (Thanks for sharing Dan!). Once the drawers were in, we screwed the entire bed base down into the floor, via structural beams and corner brackets. As vans shift while driving, we wanted to screw the bed to EITHER the floor or the walls. We opted for the floor as it had a lot more options and seemed like a safer bet.


Two sheets of 5/8" plywood provided more than enough wood to build our bed top, which we did in three pieces. We measured the width every 4" to make sure that the wood would curve with the shape of the vehicle. At its largest, the bed is 57 1/2" long and 70" wide. Graham will sleep on a bit of an angle, but it's a very reasonable size for two.


Aside from our kitchen (coming up!) most of the access into the under-bed-storage will be through top down doors. Our battery and wiring will all be in the compartment to the right of the drawers... here is our entry hole!


The other exciting thing that we have built at the back of the van is our kitchen. We have a two-burner propane stove which we really wanted to use, but we weren't interested in the hassle of doing a proper propane installation in the van. Luckily, opening the back doors creates a nice little kitchen work area, allowing us to cook outside while still being close to home! We designed the left-side underbed compartment as our kitchen storage. As the space is 16" high, we purchased a stout 11lb propane tank to fit. Graham built a plywood holder for the tank to fit in against the wall, and we added a small strip on the floor to hold the stove up on its side (extra straps for both these items are to come).


On the left back door we cut down a drawer from an old cabinet to become an edged platform for our stove to sit on when cooking. We used a leftover strip of 1/2" plywood as a support base, and bought and cut piano hinges to connect the platform. We cut webbing out of old backpacks and screwed it to the platform and the metal door so that the platform would sit flat when open. Turns out this was very very tricky... my parents' driveway slopes in two directions, so figuring out what was level was almost impossible. It took several retries and driving down the street to a flat section equipped with a cordless drill to get it right.


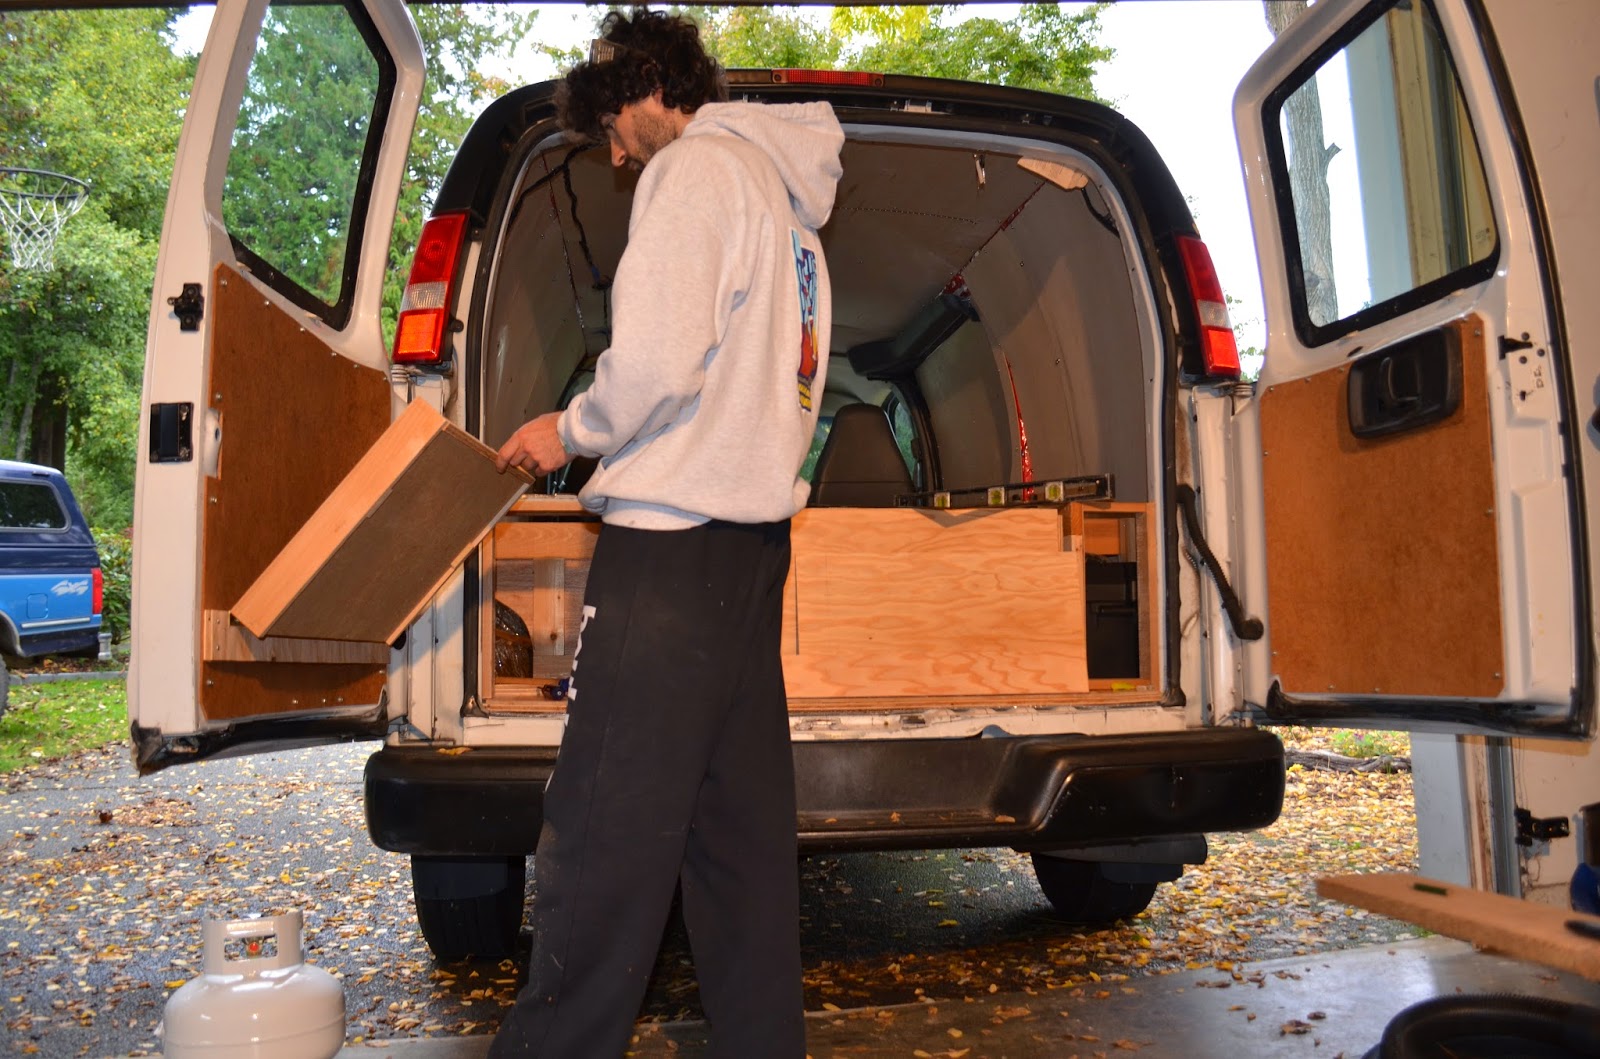
On the right side door we used the same method to create a counter prep space. I used some leftover arborite counter top from one of my parents' reno-projects and contact-cemented it to a piece of 1/2" plywood. This worked great, and now we have a smooth waterproof finish! The only change we're thinking of making to these two drop-down tables is adding adjustable straps.


We've got a few more access holes, doors, fences, and straps to add to this part of the van, but otherwise the bed and storage area is done! Meanwhile, we've been working hard on other cabinets, and collecting items for our solar set-up. Stay tuned for pictures :)

Kim and Graham